It is painful to install something on server without internet access, you need to download package manually and upload it. CCProxy could help your server use your computer internet temporarily, here is the steps :
- Download CCProxy
- Go through CCProxy setup wizard
- Open
CCProxy > Optionsto check your port and your ip address.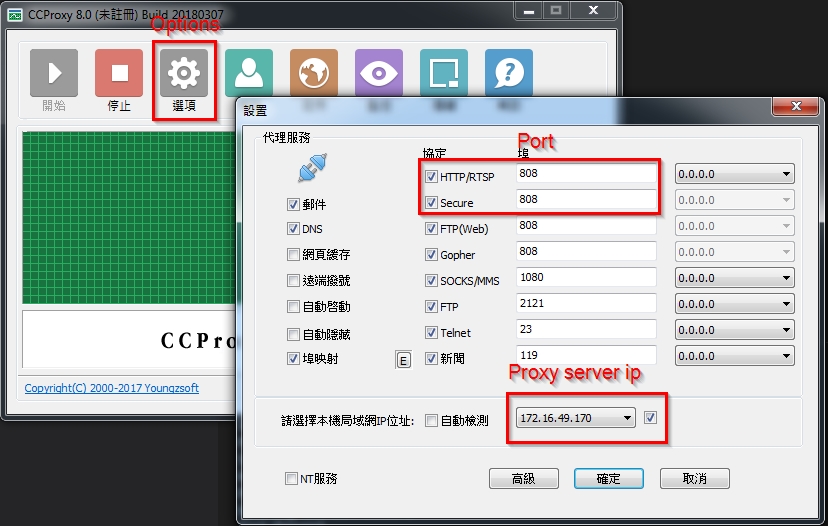
- Login to your linux server, use your CCProxy as proxy server, then you can
curlto check if it works.1
2
3
4
5
6
7
8
9
10
11
12
13
14[root@linux ~]# export http_proxy=http://172.16.49.170:808/
[root@linux ~]# export https_proxy=http://172.16.49.170:808/
[root@linux ~]# curl http://www.google.com
<html lang=en>
<meta charset=utf-8>
<meta name=viewport content="initial-scale=1, minimum-scale=1, width=device-width">
<title>Error 404 (Not Found)!!1</title>
<style>
*{margin:0;padding:0}html,code{font:15px/22px arial,sans-serif}html{background:#fff;color:#222;padding:15px}body{margin:7% auto 0;max-width:390px;min-height:180px;padding:30px 0 15px}* > body{background:url(//www.google.com/images/errors/robot.png) 100% 5px no-repeat;padding-right:205px}p{margin:11px 0 22px;overflow:hidden}ins{color:#777;text-decoration:none}a img{border:0}@media screen and (max-width:772px){body{background:none;margin-top:0;max-width:none;padding-right:0}}#logo{background:url(//www.google.com/images/branding/googlelogo/1x/googlelogo_color_150x54dp.png) no-repeat;margin-left:-5px}@media only screen and (min-resolution:192dpi){#logo{background:url(//www.google.com/images/branding/googlelogo/2x/googlelogo_color_150x54dp.png) no-repeat 0% 0%/100% 100%;-moz-border-image:url(//www.google.com/images/branding/googlelogo/2x/googlelogo_color_150x54dp.png) 0}}@media only screen and (-webkit-min-device-pixel-ratio:2){#logo{background:url(//www.google.com/images/branding/googlelogo/2x/googlelogo_color_150x54dp.png) no-repeat;-webkit-background-size:100% 100%}}#logo{display:inline-block;height:54px;width:150px}
</style>
<a href=//www.google.com/><span id=logo aria-label=Google></span></a>
<p><b>404.</b> <ins>That’s an error.</ins>
<p>The requested URL <code>/1.1</code> was not found on this server. <ins>That’s all we know.</ins>