Sing's Log

Knowledge Worth Spreading


  • Career Coach

  • Portfolio

  • Search

2024 EU Google/Meta L5面試心得

Posted on 2025-08-04 | Edited on 2025-09-08

背景

  • 台北大學企管學士,畢業當完兵直接資策會微軟班轉職當工程師
  • 3.5年博弈軟體工程師 (Taipei)
  • 5年知名通訊軟體工程師/Lead (Taipei)
  • 1.5年知名社群軟體工程師/Lead (Dublin)

面試目標

歐洲區L5職缺

時程

  • 2024四月左右JS共刷了200題左右開始嘗試面試,面了X(Twitter) & Amazon知道自己算法不太行
  • 五月積極找朋友內推
  • 六月初收到Meta/Google/Uber面試邀請,告知各recruiter需要一個月準備,此時開始用python從0開始瘋狂刷題
  • 六月底Leetcode累積刷300題,面完所有phone interview,再告知recruiter需要準備一個月
  • 七月底Leetcode累積刷450題,並準備好System Design,開始密集面試
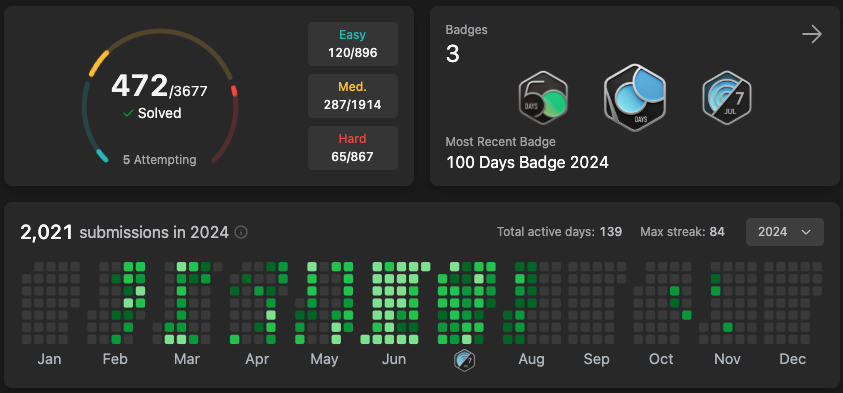
  • 八月第二週全部面完,總計10場演算法+3場System Design共13 Round全部都拿到Hire or Strong Hire,最終Leetcode共470題 (Easy 120, Medium 285, Hard 65), System design準備20題
  • 八月第二週確定Level(Meta E5 / Google L5),月底前完成Team Match
  • 九月第二週談完Final Package,最後決定加入Google UK

面試公司

總共投8間

  • 內推: Amazon, Meta, Google, Microsoft, Apple
  • 自投: OpenAI, Uber
  • 獵頭: X(Twitter)

面試結果

  • Offer: Google SWE-SRE L5, Meta SWE E5, Meta Production Engineer E4
  • Reject: Amazon, X(Twitter)
  • 沒面試機會: Apple, OpenAI
  • 決定Offer後暫停: Microsoft, Uber

X(Twitter) (Dublin)

Headhunter表示X正在Ireland徵Senior SRE要不要試,稍微聊了一下薪資期待和經驗給出履歷後就發了OA來,雖然知道當時刷很少題(100題)應該上不了,但滿想聊看看Elon musk帶領下的X長什麼樣子,也想評估一下自己水平在哪就去面試了。

  • OA: 兩題Leetcode問題給60分鐘做完,難度1 easy 1 medium
  • Coding Interview: 平台是用Hackerrank不限語言,問了2D dp問題,我是用JS寫,只給出暴力解。另外聊了過去經驗和Why X之類的問題,面試我的工程師說他很喜歡在X工作,覺得同事都很猛學到很多東西。
  • System Design: 說實在Round 1結束我以為已經沒了,但意外的是Hunter說Hiring manager還是有興趣想聊一些Architecture & culture fit就約了2面,我不太記得具體問題了只印象我表現一般。

結果:Reject

Amazon SDE (Dublin)

強者朋友內推後面試,當時大概Leetcode 150題,過了線上OA後的流程:

  • Phone Interview - 問Datastructure原理和實作細節,再問一些Web基礎問題
  • Coding Interview - 一題medium + follow up, 另30分鐘Leadership Principle
  • Lower Level Design Interview - 實作Api, 問要用什麼資料結構etc, 另30分鐘Leadership Principle
  • Behavior Interview - 1hr Leadership Principle
  • System Design Interview - 30m 給一個現有系統, 設計新功能, 30m Leadership Principle
  • Behavior Interview - 1hr Leadership Principle

感想:System Design Interview表現不好,Leadership Principle需要很大量的準備Story
結果:Recruiter打電話來Reject, 接到電話還以為有希望了XD

Meta SWE (London)

透過朋友內推,6月初接到recruiter電話,約好六月底phone interview
Meta interview都是45min, coding兩題, 最後5分鐘是給你問問題, 時間很緊所以都會滿直接給Hint, e.g. 這個用inorder應該做不出來喔! or 這題不用in-place做!

  • Phone Interview - 45min, 兩題Hard (Sort, DFS)
  • Coding - 45min, 1 medium(linkedlist), 1 hard(backtrack)
  • Coding - 45min, 2 medium(binary tree + prefixSum)
  • Coding - 45min, 1 medium(2d dp) + 1 hard(graph)
  • System Design - 45 min, System Design經典題
  • Behavior Interview - 45 min
  • Hiring commitee - Recruiter說Got hire/strong hire on everyround, especially system design幫忙爭取E6 Offer, 但HC覺得過去經驗的Scope不夠到E6,給了E5。
  • Team match
  • Offer

結果:Offer Get (E5),考慮了很久最後決定Take Google Offer

Meta Production Engineer (Dublin)

當初同時也投了這個職缺,因為本身經驗都是以JS fullstack為主,Skillset滿合就想說來試試,後來才發現interview時程太滿就只準備了SWE的面試,這裡算是硬著頭皮裸考純靠過去經驗上戰場…但還是可以分享一下:

  • UI Coding Interview - JS兩題工作上會遇到的問題
  • Lower Level Design Interview - Nodejs底層API實作
  • PE System Design - 45min, design cli tool
  • Coding / System Design / Behavior - 原本還有三場但和recuiter表達SWE已經面試很多關了能不能直接參考,後來讓我直接skip了。

結果:Offer Get (E4)

Google SWE-SRE (London + Dublin)

透過朋友內推投了London / Dublin的缺,約6月初Recuriter電話聊了一下約六月底面試

  • Phone Interview: 非常規算法題,實作面試官要求的功能 (medium~hard)
  • Coding: 這場滿特別我沒做出最佳解,我用2D DP, 最佳解是Greedy, 我最後做完有提出很可能有Greedy解,Feedback是解題和溝通都順暢, 拿到hire
  • Coding: Binary search (hard),這場很快做完提早15分鐘結束,結果只拿到Hire說解法可以再做一些優化所以沒有strong hire
  • Coding: 非常規算法題,一開始難度easy, 很顯然的O(n)解, follow up難度Hard,問有沒有辦法降複雜度,面試官說這題整年沒遇過有人解出來,他給了一些提示最後我有解出來他整個很High, 我也很High
  • System design: 45min, 非經典題型但算是工作上實際會遇到的新系統Design
  • Googleyness: 45min
  • Hiring Commitee: Skip, Recruiter電話通知所有Round都Hire,可以直接跳過HC
  • Team match: 和uk, ireland的team主管聊興趣
  • Offer

結果: Offer Get - Google UK L5, 最後決定去Google圓夢,當初當工程師一直覺得有一天要進去看看。

Uber Senior Web Developer (Amsterdam)

和recuiter聊天時有被問了一些簡單的Web快問快答問題,介紹了一下面試內容,大致上是說就考DSA,寄來的事前準備也是這樣寫,但…

  • Coding Interview: 一進去看到一個GIF動畫就傻了幾秒,是考純前端CSS + Typescript React,考題是給一個GIF動畫,請你用Reactjs coding出一個一樣的效果,我坦白跟面試官說我以為是考算法,上次寫前端是一年前但我還是可以試試,憑著印象跟很尷尬的問面試官React hook的Syntax還是做出了和動畫一模一樣的效果,面試官表示很滿意,但討論了一下我的期待是做Fullstack而非純Frontend就沒有後續了。

Uber Senior SRE (Amsterdam)

  • Coding interview: Hard * 1, 掙扎很久最後有bug沒完整做出來,特別的地方是uber面試用的平台可以run code
  • Coding interview: 1題medium follow up到hard
  • System design: system design經典題
  • System design + past experience interview: 和主管聊過去專案,recruiter說可以做個powerpoint介紹, 面試當天Recruiter告知該team headcount被內轉佔走了,但我前面的feedback都是hire,問我還有沒有興趣和其他部門主管interview,當時因為已經確定可以拿到Meta/Google offer就婉拒了。

Microsoft (Dublin)

朋友六月內推後八月才收到面試邀請和OA,做了一下難度是兩題Medium,OA過了但已經Accept Offer因此婉拒。

心得

不論是coding interview或是system design, 用有系統的方式刷題很重要,網路上很多高手有介紹不同流派,找到一個適合自己的方法後就堅持下去,以下是一些我的感悟

演算法

  • 在有限時間下,Leetcode精和多需要找到一個平衡。精:每一種題型都要做過,隔一陣子要複習,不一定要整個重寫但是要能想出對的思路。多:Leetcode每日 + weekly/biweekly contest,同時培養面對未知題型的能力。
  • 平時刷題要有自言自語的習慣,假裝自己在和面試官對話,而且每一題都要逼自己想出時間複雜度,最好是先把思路/複雜度都想好了才開始實作。
  • 英文是一個很大的門檻,練習時要強迫全英文自言自語
  • 短時間認真刷一定會頭痛的,加油撐下去,當時我每天頭痛,很常半夜醒來發覺腦子在快速跑演算法就睡不著了。在頭痛刷題的你並不孤單

System Design

  • 釐清需求才開始Design
  • Back-of-the-envelope calculation要多練習
  • 邊畫圖一樣也要邊自言自語,模擬和面試官講解
  • 不要死背,交叉參考同一個系統網路上不同的design方式,結合自己的過去經驗畫出屬於自己的架構圖

自己的一些練習記錄
Bridge to Gnosis chain to earn APR from DAI

Posted on 2024-07-16 | Edited on 2025-09-08 |

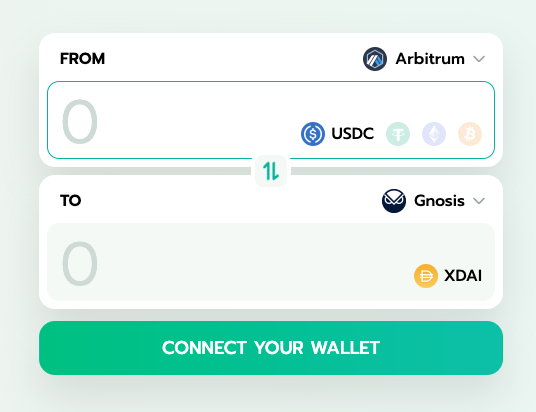
In this tutorial, I will walk you through the steps to bridge your assets to the Gnosis Chain and earn APR from DAI. By the end of this guide, you’ll know how to convert your assets to xDAI, bridge them, and start earning interest using sDAI. Let’s dive in!

Background on MakerDAO and DAI

What is MakerDAO?

MakerDAO is a decentralized autonomous organization on the Ethereum blockchain that allows users to generate the stablecoin DAI. It was one of the first decentralized finance (DeFi) projects and remains a cornerstone of the DeFi ecosystem. MakerDAO enables the creation of DAI by collateralizing various assets through its Maker Protocol.

What is DAI?

DAI is a decentralized stablecoin soft-pegged to the US Dollar, meaning 1 DAI is approximately equal to 1 USD. Unlike other stablecoins that are backed directly by USD reserves, DAI is backed by collateral in the form of various cryptocurrencies locked in smart contracts on the Ethereum blockchain. This structure ensures decentralization and reduces dependency on traditional financial systems.

Step 1: Bridge Your Asset to Gnosis Chain

First, you’ll need to move your assets to the Gnosis Chain as xDAI. Here’s how to do it:

  1. Go to Meson.fi: Visit Meson.fi, a reliable cross-chain swap service.
  2. Select Your Asset: Choose the cryptocurrency you want to bridge (e.g., USDT, USDC, DAI).
  3. Bridge to Gnosis Chain: Follow the instructions to bridge your asset to the Gnosis Chain. During this process, your asset will be converted to xDAI.

Step 2: Convert xDAI to sDAI

Now that you have xDAI on the Gnosis Chain, the next step is to convert it to sDAI to start earning APR.

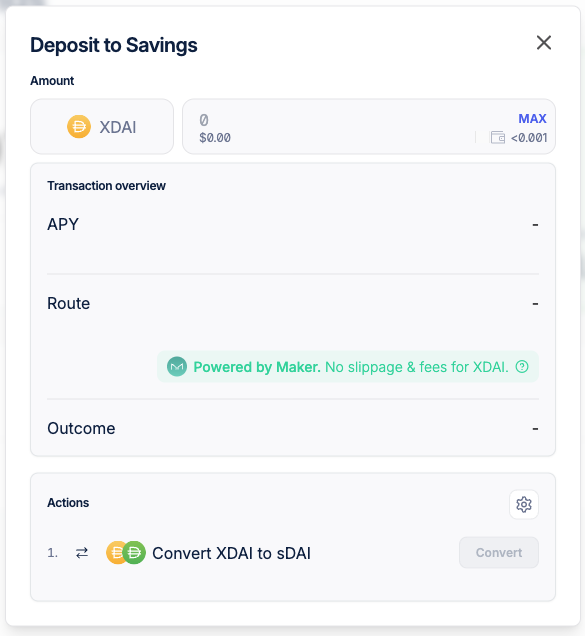
  1. Go to MakerDAO Spark App: Navigate to the Spark App, an interface provided by MakerDAO for managing stablecoins.
  2. Click ‘Start Saving’: Once on the Spark App, locate and click the Start Saving button.
  3. Convert xDAI to sDAI: Follow the prompts to convert your xDAI to sDAI. This will enable you to participate in savings and earn interest on your holdings.

Step 3: Enjoy the APR

With your xDAI now converted to sDAI, you can start earning APR. MakerDAO’s Spark App manages the savings process, so you don’t need to worry about actively managing your assets. Simply deposit your sDAI and watch your savings grow over time.

Additional Tips

  • Monitor Rates: Regularly check the APR rates offered by different platforms to ensure you are getting the best returns.
  • Security: Always use trusted platforms and double-check URLs to avoid phishing scams.
  • Stay Informed: Keep up-to-date with the latest developments in the DeFi space to maximize your earnings.

By following these steps, you can efficiently bridge your assets to the Gnosis Chain and start earning interest on your DAI. Happy saving!

Changing Sequence in PostgreSQL: A Step-by-Step Guide

Posted on 2024-06-17 | Edited on 2025-09-08 |

Introduction

In PostgreSQL, sequences are integral for generating unique identifiers, especially for SERIAL or BIGSERIAL columns. Issues with sequences can arise after database migrations or due to automated processes, such as those handled by tools like Retool. This guide provides steps to adjust a sequence associated with an id column in PostgreSQL, with consideration for environments like Retool that automate database operations.

Step-by-Step Guide

  1. Identify the Sequence Name

    First, determine the name of the sequence associated with your table and column. Use the pg_get_serial_sequence function:

    1
    SELECT pg_get_serial_sequence('your_table_name', 'id');

    Replace 'your_table_name' with your actual table name and 'id' with the column name ('id' in your case).

  2. Check Current Maximum Value

    Find the current maximum value of the id column to set the sequence correctly:

    1
    SELECT MAX(id) FROM your_table_name;
  3. Reset the Sequence

    Use SETVAL to adjust the sequence to the desired next value:

    1
    SELECT setval('your_sequence_name', your_next_value);

    Replace 'your_sequence_name' with the sequence name obtained in step 1, and your_next_value with the appropriate next value based on the maximum id value.

  4. Verify the Sequence

    Confirm the sequence update by checking its next value:

    1
    SELECT nextval('your_sequence_name');

Example Scenario

Assuming you’re using Retool and encountered sequence issues after a migration:

  1. Identify the Sequence Name

    1
    2
    SELECT pg_get_serial_sequence('users', 'id');
    -- This might return 'public.clients_client_id_seq' based on your setup in Retool.
  2. Check Current Maximum Value

    1
    2
    SELECT MAX(id) FROM users;
    -- Assuming this returns 100, indicating the next id should start from 101.
  3. Reset the Sequence

    1
    SELECT setval('public.clients_client_id_seq', 101);
  4. Verify the Sequence

    1
    2
    SELECT nextval('public.clients_client_id_seq');
    -- This should return 101 if the sequence was set correctly.

Conclusion

Managing sequences in PostgreSQL is crucial for ensuring database integrity, especially in environments where automated processes like Retool handle migrations. By following these steps, you can effectively adjust sequences and prevent issues such as duplicate key errors in your PostgreSQL database managed by Retool.

Lexicographical vs Numerical Sorting in JavaScript Array.prototype.sort()

Posted on 2024-05-25 | Edited on 2025-09-08 |

Default behavior - Lexicographical Sorting

By default, the sort() method sorts the elements of an array as strings. This means the elements are compared based on their Unicode code point values, leading to lexicographical order, which is not always the intended numerical order. This default behavior can cause bugs when sorting numbers.

Example:

1
2
3
const nums = [-1, -2, -3, -4, 0, 1, 2, 3, 4];
nums.sort();
console.log(nums); // Output: [-1, -2, -3, -4, 0, 1, 2, 3, 4]

In this example, the sort() method treats the numbers as strings and sorts them based on the Unicode values, resulting in an order that looks correct but isn’t numerically accurate. This can lead to unexpected behavior and bugs in your code.

Numerical Sorting

To sort the numbers correctly in ascending order, you need to provide a comparison function to the sort() method. The comparison function should subtract one number from the other, ensuring numerical comparison.

Example:

1
2
3
const nums = [-1, -2, -3, -4, 0, 1, 2, 3, 4];
nums.sort((a, b) => a - b);
console.log(nums); // Output: [-4, -3, -2, -1, 0, 1, 2, 3, 4]

In this corrected example, the comparison function (a, b) => a - b ensures that the array is sorted numerically in ascending order.

Conclusion

When sorting numbers in JavaScript, always use a comparison function with the sort() method to ensure the elements are sorted numerically. This small adjustment prevents unexpected results and ensures your array is in the correct order, avoiding potential bugs caused by default lexicographical sorting.

Automating tasks with PostgreSQL Triggers

Posted on 2024-04-29 | Edited on 2025-09-08 |

Triggers in PostgreSQL provide a powerful mechanism to automate tasks within the database. Let’s explore how to use triggers to automate common tasks.

1. Automatically Copying User Data to Orders

1
2
3
4
5
6
7
8
9
10
11
12
13
14
15
16
17
CREATE OR REPLACE FUNCTION copy_user_data_to_order()
RETURNS TRIGGER AS $$
BEGIN
-- Concatenate user data into a string
SELECT u.firstname || ' ' || u.lastname || ', ' || u.email
INTO NEW.user
FROM users u
WHERE u.id = NEW.user_id;

RETURN NEW;
END;
$$ LANGUAGE plpgsql;

CREATE TRIGGER insert_order_trigger
BEFORE INSERT OR UPDATE ON public.orders
FOR EACH ROW
EXECUTE FUNCTION copy_user_data_to_order();

Whenever a new order is inserted or updated in the orders table, this trigger function automatically fetches the corresponding user data and stores it as a concatenated string in the user column of the order.

2. Updating Timestamp on Record Modification

1
2
3
4
5
6
7
8
9
CREATE OR REPLACE FUNCTION public.update_timestamp()
RETURNS trigger
LANGUAGE plpgsql
AS $function$
BEGIN
NEW.updated := NOW();
RETURN NEW;
END;
$function$

This trigger function updates the updated timestamp column of a record with the current timestamp whenever the record is modified.

3. Using INSTEAD OF Trigger on a View

Want to update the underlying tables by View? Use the INSTEAD OF trigger

1
2
3
4
5
6
7
8
9
10
11
12
13
14
15
16
17
18
CREATE OR REPLACE FUNCTION update_order_user_view()
RETURNS TRIGGER AS $$
BEGIN
-- Update the underlying tables as needed
UPDATE orders
SET paid = NEW.paid,
register_success = NEW.register_success,
enable = NEW.enable
WHERE order_id = NEW.order_id;

RETURN NEW;
END;
$$ LANGUAGE plpgsql;

CREATE TRIGGER update_order_user_trigger
INSTEAD OF UPDATE ON order_user_view
FOR EACH ROW
EXECUTE FUNCTION update_order_user_view();

This INSTEAD OF trigger intercepts UPDATE operations on the order_user_view and updates the corresponding rows in the orders table based on the new values in the view.

Triggers in PostgreSQL allow for automation of repetitive tasks, enhancing the functionality and efficiency of your database.

Beware of the Array(n).fill({}) Pitfall in JavaScript

Posted on 2024-02-25 | Edited on 2025-09-08 |

When working with arrays in JavaScript, it’s essential to be mindful of how you initialize them, as certain methods can lead to unexpected behavior. One such pitfall involves inadvertently using Array(n).fill({}) to create an array of objects.

Consider the following code snippet:

1
2
3
4
5
6
7
8
const n = 5;
const memo = Array(n).fill({});

// Later in the code...
memo[0].value = 10;

console.log(memo);
// [{"value":10},{"value":10},{"value":10},{"value":10},{"value":10}]

At first glance, it might seem like memo is an array of five separate empty objects. However, this is not the case. The fill() method populates the array with references to the same object, so modifying one element affects all others.

In the example above, when we assign a value property to memo[0], it inadvertently modifies all objects within the array. This behavior can be particularly problematic in scenarios where each array element should be independent.

To avoid this issue, consider using Array.from() or a loop to initialize arrays with unique objects:

1
2
3
4
5
6
7
8
// Using Array.from()
const memo = Array.from({ length: n }, () => ({}));

// Using a loop
const memo = [];
for (let i = 0; i < n; i++) {
memo.push({});
}

By being aware of this common mistake and choosing appropriate initialization methods, you can prevent unexpected bugs and ensure the integrity of your JavaScript code.

Deploying a Machine Learning Model as an API with FastAPI, Docker, and Knative

Posted on 2024-02-16 | Edited on 2025-09-08 |

In the post Leveraging scikit-learn for Invoice Classification using Text Data, we explored how to train a machine learning model to classify invoices based on their textual content using scikit-learn. However, once we have a model trained, a natural next step is to make it accessible to other systems or services through an API. This raises the question: how do we deploy it as a scalable API?

In this blog post, we’ll address this question by walking through the process of wrapping our scikit-learn model as an API using FastAPI, containerizing it with Docker, and deploying it on Knative for serverless scaling. Let’s dive in!

Wrapping the Model as an API with FastAPI

We’ll start by wrapping our machine learning model as an API using FastAPI, a modern web framework for building APIs with Python. FastAPI offers automatic OpenAPI documentation generation and high performance, making it an excellent choice for our use case.

1
2
3
4
5
6
7
8
9
10
11
12
13
14
15
16
17
18
19
20
21
22
23
24
25
26
27
28
29
30
31
32
33
34
35
36
37
38
39
40
41
import pickle
from typing import Dict, List
from fastapi import FastAPI
from pydantic import BaseModel, Field
from util.get_prediction_probabilities import get_prediction_probabilities

def load_model():
with open("model.pkl", "rb") as file:
model = pickle.load(file)
return model

model = load_model()
app = FastAPI()

class PredictionResult(BaseModel):
text: str
prediction: str
probabilities: Dict[str, float]

class PredictionResponse(BaseModel):
results: List[PredictionResult] = Field(
examples=[
{
"text": "netflix訂閱",
"prediction": "subscription",
"probabilities": {
"subscription": 0.916624393150892,
"learning": 0.023890389044000114,
},
},
]
)

class PredictionRequest(BaseModel):
texts: List[str] = Field(..., example=["netflix訂閱"])

@app.post("/predict", response_model=PredictionResponse)
async def predict(request: PredictionRequest):
texts = request.texts
results = get_prediction_probabilities(model, texts)
return {"results": results}

Building a Docker Image

Next, we’ll containerize our FastAPI application using Docker. Docker provides a lightweight and portable way to package applications and their dependencies into containers, ensuring consistency across different environments.

1
2
3
4
5
6
7
8
9
10
11
12
13
14
15
16
17
# Use a base image with Python installed
FROM python:3.9-slim

# Set the working directory inside the container
WORKDIR /app

# Copy the requirements file into the container
COPY requirements.txt .

# Install the Python dependencies
RUN pip install -r requirements.txt

# Copy the application code
COPY . .

# Set the entrypoint command
CMD ["uvicorn", "app:app", "--host", "0.0.0.0", "--port", "5050"]

Deployment on Knative

Finally, we’ll deploy our Docker image to Knative, a Kubernetes-based platform for building, deploying, and managing modern serverless workloads. Knative offers auto-scaling capabilities, allowing our API to handle varying levels of traffic efficiently.

1
2
3
4
5
6
7
8
9
10
11
12
13
14
15
16
17
18
19
20
21
22
23
24
apiVersion: serving.knative.dev/v1
kind: Service
metadata:
name: invoice-classifier
spec:
template:
metadata:
annotations:
autoscaling.knative.dev/target-burst-capacity: "500"
autoscaling.knative.dev/class: "hpa.autoscaling.knative.dev"
autoscaling.knative.dev/metric: "cpu"
autoscaling.knative.dev/target: "60"
autoscaling.knative.dev/minScale: "2"
spec:
containers:
- name: invoice-classifier
image: your-docker-registry/invoice-classifier
resources:
limits:
cpu: 1
memory: 2Gi
requests:
cpu: 300m
memory: 500Mi

Conclusion

In this blog post, we’ve demonstrated how to deploy a machine learning model as an API using FastAPI, Docker, and Knative. By following these steps, you can make your machine learning models accessible as scalable and reliable APIs, enabling seamless integration into your applications and workflows.

Leveraging scikit-learn for Invoice Classification using Text Data

Posted on 2024-02-16 | Edited on 2025-09-08 |

In the realm of data science and machine learning, text classification is a common task with a wide range of applications. One such application is invoice classification, where invoices are categorized based on their textual content. In this blog post, we’ll explore how to accomplish this task using scikit-learn, a popular machine learning library in Python.

Understanding the Data

Before diving into the code, let’s first understand the data we’re working with. Our dataset consists of invoices along with their corresponding categories. We’ve gathered data from various sources, including human-marked data, generated data, and crawled data from the web.

1
2
3
4
5
6
7
8
9
import pandas as pd

# Load the data
data1 = pd.read_csv('./data/human-marked.csv')
data2 = pd.read_csv('./data/generated/train.csv')
data3 = pd.read_csv('./data/crawled/train.csv')

# Concatenate the data into a single DataFrame
data = pd.concat([data1, data2, data3])

Data Preprocessing and Exploration

After loading the data, we preprocess it to ensure uniformity, such as removing redundant spaces from category labels. Additionally, we explore the distribution of categories in our dataset to gain insights into the class distribution.

1
2
3
4
5
# Preprocessing
data['categories'] = data['categories'].str.strip()

# Explore category distribution
category_counts = data['categories'].value_counts()

Building the Classification Pipeline

With our data ready, we construct a classification pipeline using scikit-learn. Our pipeline consists of a TF-IDF vectorizer with Jieba as the Chinese tokenizer for feature extraction and a linear support vector classifier (LinearSVC) as the classification model.

1
2
3
4
5
6
7
8
9
10
11
12
13
14
15
16
from sklearn.feature_extraction.text import TfidfVectorizer
from sklearn.pipeline import Pipeline
from sklearn.calibration import CalibratedClassifierCV
from sklearn.svm import LinearSVC
from util.tokenizer import tokenizer

# Split the data into training and testing sets
X = data['text'].values
y = data['categories'].values
X_train, X_test, y_train, y_test = train_test_split(X, y, test_size=0.2, random_state=42)

# Define the pipeline
pipeline = Pipeline([
('jieba', TfidfVectorizer(tokenizer=tokenizer)),
('clf', CalibratedClassifierCV(LinearSVC())),
])

util.tokenizer (For Chinese tokenization)

1
2
3
4
5
6
7
import re
import jieba

def tokenizer(text):
words = list(jieba.cut(text))
words = [word for word in words if re.match(r'^[\w\u4e00-\u9fff]+$', word)]
return words

Model Training and Evaluation

Next, we train our model using grid search to find the optimal hyperparameters and evaluate its performance on the test set.

1
2
3
4
5
6
7
8
9
10
11
12
13
14
15
16
from sklearn.model_selection import GridSearchCV
from sklearn.metrics import classification_report

# Define the parameter grid for grid search
param_grid = {
# Hyperparameters to tune
}

# Perform grid search with cross-validation
grid_search = GridSearchCV(pipeline, param_grid, cv=2)
grid_search.fit(X_train, y_train)

# Evaluate the model on the test set
best_estimator = grid_search.best_estimator_
y_pred = best_estimator.predict(X_test)
report = classification_report(y_test, y_pred)

Inference and Model Deployment

Finally, we demonstrate how to use the trained model for inference on new invoice texts and save the model for future use.

1
2
3
4
5
6
7
8
9
import pickle

# Example inference on new invoice texts
test_texts = ['台電電費', 'Apple', 'netflix訂閱', '瓦斯現金券', '不鏽鋼鍋']
results = get_prediction_probabilities(best_estimator, test_texts)

# Save the trained model
with open('model.pkl', 'wb') as file:
pickle.dump(best_estimator, file)

Conclusion

In this blog post, we’ve demonstrated how to leverage scikit-learn to classify invoices based on their textual content. By building a robust classification pipeline and fine-tuning hyperparameters using grid search, we can achieve accurate categorization of invoices, enabling streamlined invoice processing and management.

Resolving IntelliJ 'Cannot Resolve Symbol' Error

Posted on 2023-11-21 | Edited on 2025-09-08 |

If you’ve encountered the Cannot resolve symbol... error in IntelliJ IDEA after switching branches, you’re not alone. This frustrating issue can occur even when your code is error-free and compiles successfully from the command line.

Solution

To resolve this issue, follow these steps:

  1. Remove the targets folder, if it’s a maven project, you could do mvn clean
  2. Expand the Maven plugin in IntelliJ IDEA’s sidebar.
  3. Click the Reload All Maven Projects button with the refresh icon.

By following these steps, you can make the Cannot resolve symbol... error vanish and continue coding smoothly. This simple fix can save you time and frustration.

Reference

For more details and community discussions on this issue, check out this Stack Overflow thread.

Automating Google Calendar from Gmail Content

Posted on 2023-11-08 | Edited on 2025-09-08 |

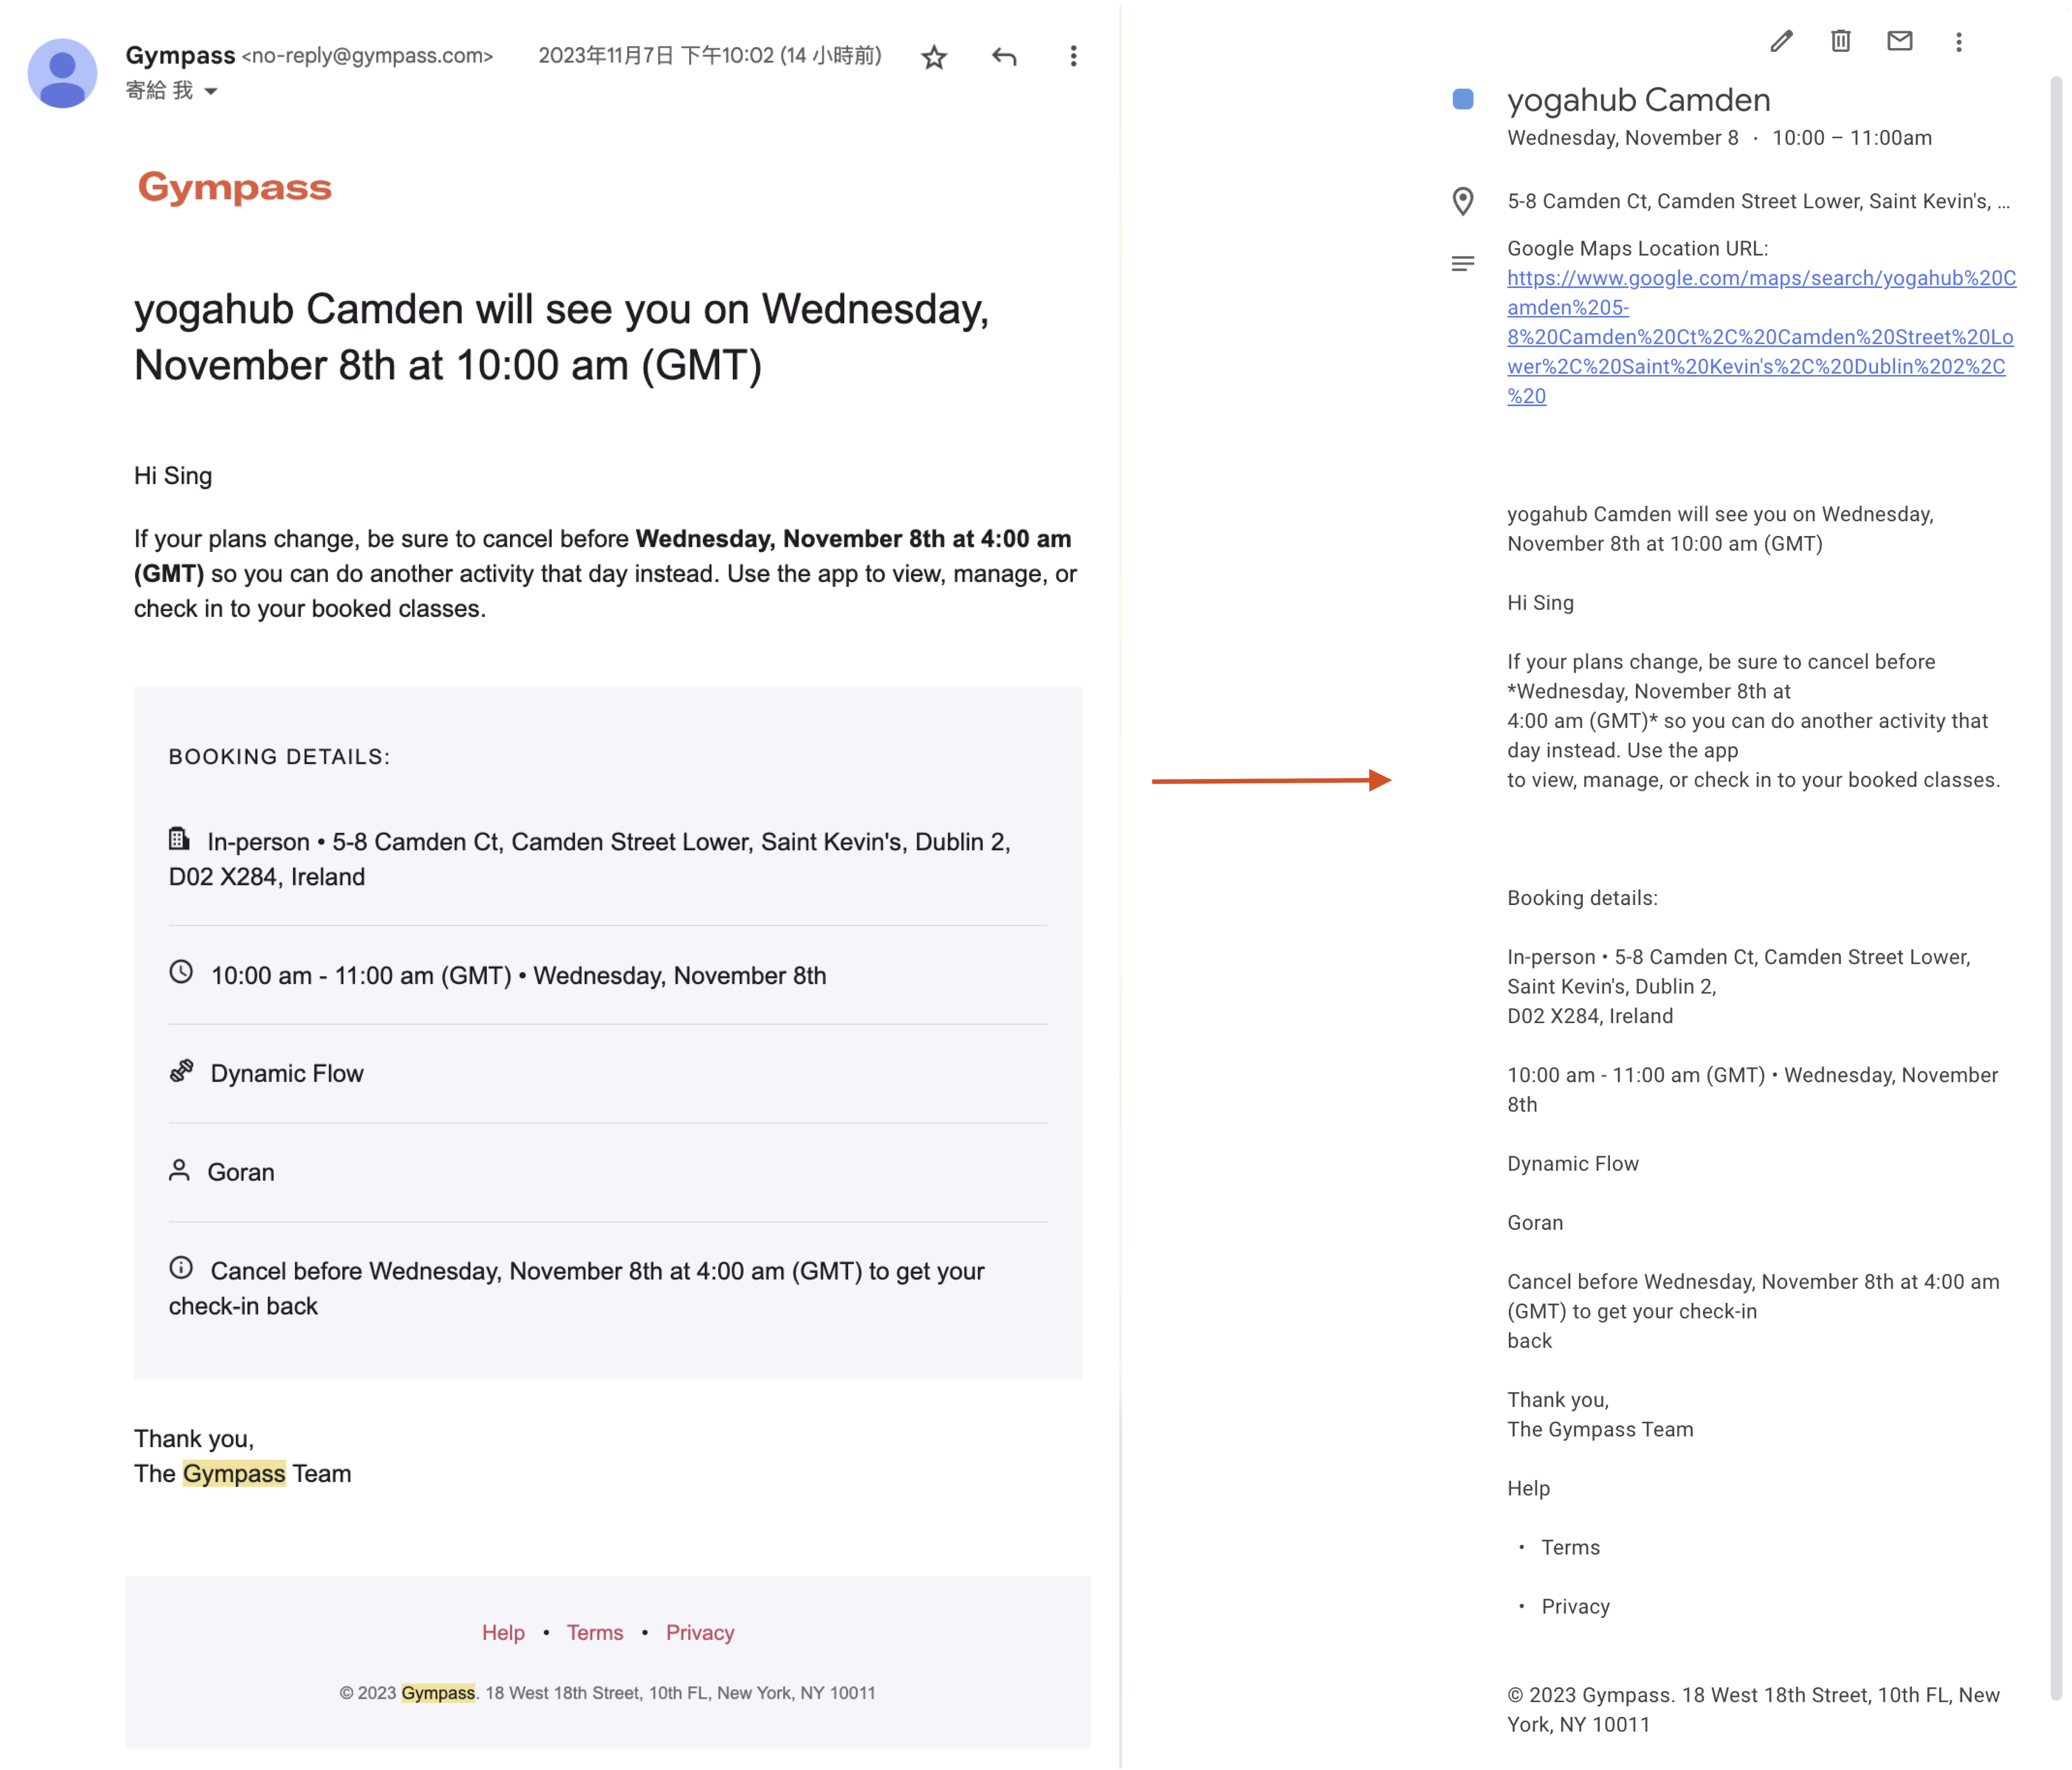
As a software engineer based in Dublin, Ireland, I often find myself juggling a busy schedule. Managing my fitness classes, work meetings, and personal commitments can be quite a challenge. To streamline this process, I decided to embark on a project to automatically create Google Calendar events from Gympass confirmation emails. In this blog post, I’ll walk you through the steps and code I used to accomplish this task.

The Problem

Gympass, a popular fitness service, sends confirmation emails whenever I book a fitness class. These emails contain valuable information about the class, such as the date, time, location, and instructor. Manually adding these details to my Google Calendar was becoming a time-consuming task.

The Solution

To automate this process, I created a Google Apps Script that runs in my Gmail account. This script scans my inbox for Gympass confirmation emails, extracts the relevant information, and creates corresponding Google Calendar events. Here’s an overview of how it works:

  1. Create a Google Apps Script Project:

    • Open your Gmail account in a web browser.
    • Click on the “Apps Script” icon in the top-right corner (it looks like a square with a pencil).
    • This will open the Google Apps Script editor.
  2. Write the Script:

    • In the Google Apps Script editor, copy and paste the script code provided in this blog post.
  3. Save and Name the Project:

    • Give your project a name by clicking on “Untitled Project” at the top left and entering a name.
  4. Authorization:

    • The script will need authorization to access your Gmail and Google Calendar. Click on the run button (▶️) in the script editor.
    • Follow the prompts to grant the necessary permissions to the script.
  5. Trigger the Script:

    • To automate the script’s execution, you can set up triggers. Click on the clock icon ⏰ in the script editor.
    • Create a new trigger that specifies when and how often the script should run. You might want it to run periodically, such as every hour.
  6. Email Search: The script starts by searching your inbox for emails from `[email protected]`. This ensures that it only processes Gympass emails.

  7. Email Parsing: For each Gympass email found, the script extracts the email’s subject and plain text body.

  8. Cancellation Handling: If the email subject indicates that you canceled a booking, the script performs a cancellation action (you can customize this based on your business logic).

  9. Data Extraction: For non-cancellation emails, the script removes any unnecessary footer text and URLs from the email body.

  10. Event Details Extraction: Using regular expressions, the script extracts the date, time, location, and event title from the cleaned email body.

  11. Month-to-Number Conversion: It converts the month name to a numeric value for creating a Date object.

  12. Event Creation: With all the details in hand, the script creates a new Google Calendar event. It includes the event title, start and end times, location, and a Google Maps link to the event’s location.

  13. Duplicate Event Check: Before creating an event, the script checks if an event with the same date, time, title, and location already exists in the calendar to avoid duplicates.

Code Organization

To keep the code clean and maintainable, I divided it into several functions:

  • extractAndCreateCalendarEvent: The main function that orchestrates the entire process.
  • extractEventDetails: Extracts event details from the email body using regular expressions.
  • monthToNumber: Converts month names to numeric values.
  • createCalendarEvent: Creates a new Google Calendar event.
  • isEventExist: Checks if an event with the same details already exists.
  • removeFooterAndUrls: Removes unnecessary footer text and URLs from the email body.
  • cancelEvent: Placeholder for handling event cancellations (customize based on your needs).
  • parseTime: Parses time in HH:mm a format and returns it as milliseconds.
1
2
3
4
5
6
7
8
9
10
11
12
13
14
15
16
17
18
19
20
21
22
23
24
25
26
27
28
29
30
31
32
33
34
35
36
37
38
39
40
41
42
43
44
45
46
47
48
49
50
51
52
53
54
55
56
57
58
59
60
61
62
63
64
65
66
67
68
69
70
71
72
73
74
75
76
77
78
79
80
81
82
83
84
85
86
87
88
89
90
91
92
93
94
95
96
97
98
99
100
101
102
103
104
105
106
107
108
109
110
111
112
113
114
115
116
117
118
119
120
121
122
123
124
125
126
127
128
129
130
131
132
133
134
135
136
137
138
139
140
141
142
143
144
145
146
147
148
149
150
151
152
153
154
155
// Main function to process emails and create calendar events
const extractAndCreateCalendarEvent = () => {
const searchString = "from:[email protected]";
const threads = GmailApp.search(searchString);

for (let i = 0; i < threads.length; i++) {
const messages = threads[i].getMessages();
for (let j = 0; j < messages.length; j++) {
const message = messages[j];
const subject = message.getSubject();
const body = message.getPlainBody();

if (subject.includes("You canceled your booking")) {
cancelEvent(body);
} else {
const cleanedBody = removeFooterAndUrls(body);
const eventDetails = extractEventDetails(cleanedBody);

if (eventDetails) {
createCalendarEvent(eventDetails, cleanedBody);
}
}
}
}
};

// Extract the event details from the email body
const extractEventDetails = (body) => {
const dateRegex = /(\w+), ([A-Za-z]+) (\d+)th at (\d+:\d+ [APap][Mm]) \(GMT\)/;
const locationRegex = /In-person • (.+)/;
const titleRegex = /(.*?) will see you/;
const timeRegex = /(\d+:\d+ [APap][Mm]) - (\d+:\d+ [APap][Mm]) \(GMT\)/;

const dateMatch = body.match(dateRegex);
const locationMatch = body.match(locationRegex);
const titleMatch = body.match(titleRegex);
const timeMatch = body.match(timeRegex);

if (dateMatch && locationMatch && titleMatch && timeMatch) {
const dayOfWeek = dateMatch[1];
const month = dateMatch[2];
const day = dateMatch[3];
const eventTimeStart = timeMatch[1];
const eventTimeEnd = timeMatch[2];
const location = locationMatch[1];
const eventTitle = titleMatch[1];

return {
dayOfWeek,
month,
day,
eventTimeStart,
eventTimeEnd,
location,
eventTitle,
};
}

return null;
};

// Convert month name to a numeric value
const monthToNumber = (month) => {
const monthMap = {
"January": 0,
"February": 1,
"March": 2,
"April": 3,
"May": 4,
"June": 5,
"July": 6,
"August": 7,
"September": 8,
"October": 9,
"November": 10,
"December": 11
};
return monthMap[month];
};

// Create a Google Calendar event
const createCalendarEvent = (eventDetails, cleanedContent) => {
const {
dayOfWeek,
month,
day,
eventTimeStart,
eventTimeEnd,
location,
eventTitle,
} = eventDetails;

const monthNumber = monthToNumber(month);

const eventDate = new Date(new Date().getFullYear(), monthNumber, day, 0, 0, 0);
const eventStartTime = new Date(new Date().getFullYear(), monthNumber, day, 0, 0, 0);
eventStartTime.setMilliseconds(parseTime(eventTimeStart));

const eventEndTime = new Date(new Date().getFullYear(), monthNumber, day, 0, 0, 0);
eventEndTime.setMilliseconds(parseTime(eventTimeEnd));

const gymName = eventTitle;
const mapsUrl = 'https://www.google.com/maps/search/' + encodeURIComponent(`${gymName} ${location}`);
const description = `Google Maps Location URL: ${mapsUrl}\n${cleanedContent}`;

if (!isEventExist(eventDate, eventEndTime, eventTitle, location)) {
const calendar = CalendarApp.getDefaultCalendar();
calendar.createEvent(eventTitle, eventStartTime, eventEndTime, { location, description });
}
};

// Check if an event already exists
const isEventExist = (startDate, endDate, title, location) => {
const calendar = CalendarApp.getDefaultCalendar();
const events = calendar.getEvents(startDate, endDate);
for (let i = 0; i < events.length; i++) {
if (events[i].getTitle() === title && events[i].getLocation() === location) {
return true;
}
}
return false;
};

// Remove footer text and URLs
const removeFooterAndUrls = (body) => {
const footerRegex = /Help\n<.*?>[\s\S]*$/;
const cleanedBody = body.replace(footerRegex, '');
const urlRegex = /<[^>]*>/g;
const cleanedContent = cleanedBody.replace(urlRegex, '');
return cleanedContent;
};


// Cancel an event
const cancelEvent = (body) => {
// Parse the content of the cancellation email and perform the cancellation action as needed
// You can identify the event to cancel based on the information in the email content
// The specific implementation of this depends on your business logic
};

// Helper function to parse time in HH:mm a format and return it as milliseconds
const parseTime = (timeString) => {
const [time, amPm] = timeString.split(' ');
const [hours, minutes] = time.split(':');
let hoursInt = parseInt(hours, 10);
const minutesInt = parseInt(minutes, 10);

if (amPm.toLowerCase() === 'pm' && hoursInt !== 12) {
hoursInt += 12;
} else if (amPm.toLowerCase() === 'am' && hoursInt === 12) {
hoursInt = 0;
}

return (hoursInt * 60 + minutesInt) * 60000; // Convert to milliseconds
};

Conclusion

Automating the creation of Google Calendar events from Gympass emails has significantly reduced the time and effort required to manage fitness classes and appointments. With this script running in the background, you can focus on your workouts and let technology take care of the scheduling.

By following the steps outlined in this blog post, you can set up your own automated email-to-calendar integration and adapt it to your specific needs. Happy coding!

12…10
Sing Ming Chen

Sing Ming Chen

Sing's log, a developer's blog

91 posts
260 tags
GitHub E-Mail Linkedin
© 2025 Sing Ming Chen
Powered by Hexo v3.9.0
|
Theme — NexT.Gemini v6.3.0