背景
- 台北大學企管學士,畢業當完兵直接資策會微軟班轉職當工程師
- 3.5年博弈軟體工程師 (Taipei)
- 5年知名通訊軟體工程師/Lead (Taipei)
- 1.5年知名社群軟體工程師/Lead (Dublin)
面試目標
歐洲區L5職缺
時程
- 2024四月左右JS共刷了200題左右開始嘗試面試,面了X(Twitter) & Amazon知道自己算法不太行
- 五月積極找朋友內推
- 六月初收到Meta/Google/Uber面試邀請,告知各recruiter需要一個月準備,此時開始用python從0開始瘋狂刷題
- 六月底Leetcode累積刷300題,面完所有phone interview,再告知recruiter需要準備一個月
- 七月底Leetcode累積刷450題,並準備好System Design,開始密集面試
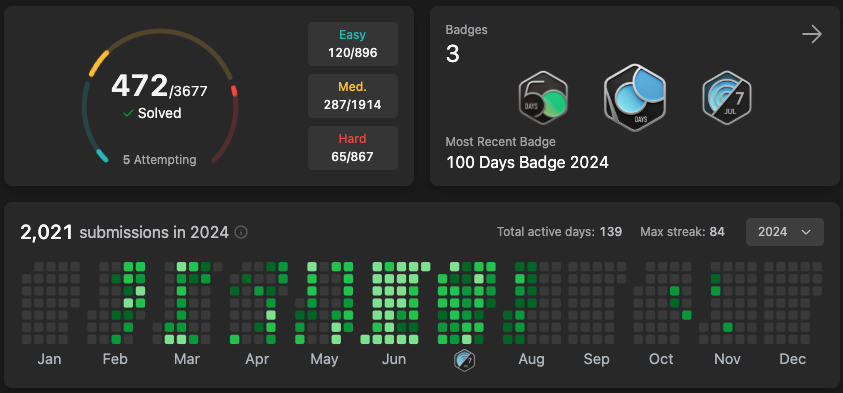
- 八月第二週全部面完,總計10場演算法+3場System Design共13 Round全部都拿到Hire or Strong Hire,最終Leetcode共470題 (Easy 120, Medium 285, Hard 65), System design準備20題
- 八月第二週確定Level(Meta E5 / Google L5),月底前完成Team Match
- 九月第二週談完Final Package,最後決定加入Google UK
面試公司
總共投8間
- 內推: Amazon, Meta, Google, Microsoft, Apple
- 自投: OpenAI, Uber
- 獵頭: X(Twitter)
面試結果
- Offer: Google SWE-SRE L5, Meta SWE E5, Meta Production Engineer E4
- Reject: Amazon, X(Twitter)
- 沒面試機會: Apple, OpenAI
- 決定Offer後暫停: Microsoft, Uber
X(Twitter) (Dublin)
Headhunter表示X正在Ireland徵Senior SRE要不要試,稍微聊了一下薪資期待和經驗給出履歷後就發了OA來,雖然知道當時刷很少題(100題)應該上不了,但滿想聊看看Elon musk帶領下的X長什麼樣子,也想評估一下自己水平在哪就去面試了。
- OA: 兩題Leetcode問題給60分鐘做完,難度1 easy 1 medium
- Coding Interview: 平台是用Hackerrank不限語言,問了2D dp問題,我是用JS寫,只給出暴力解。另外聊了過去經驗和Why X之類的問題,面試我的工程師說他很喜歡在X工作,覺得同事都很猛學到很多東西。
- System Design: 說實在Round 1結束我以為已經沒了,但意外的是Hunter說Hiring manager還是有興趣想聊一些Architecture & culture fit就約了2面,我不太記得具體問題了只印象我表現一般。
結果:Reject
Amazon SDE (Dublin)
強者朋友內推後面試,當時大概Leetcode 150題,過了線上OA後的流程:
- Phone Interview - 問Datastructure原理和實作細節,再問一些Web基礎問題
- Coding Interview - 一題medium + follow up, 另30分鐘Leadership Principle
- Lower Level Design Interview - 實作Api, 問要用什麼資料結構etc, 另30分鐘Leadership Principle
- Behavior Interview - 1hr Leadership Principle
- System Design Interview - 30m 給一個現有系統, 設計新功能, 30m Leadership Principle
- Behavior Interview - 1hr Leadership Principle
感想:System Design Interview表現不好,Leadership Principle需要很大量的準備Story
結果:Recruiter打電話來Reject, 接到電話還以為有希望了XD
Meta SWE (London)
透過朋友內推,6月初接到recruiter電話,約好六月底phone interview
Meta interview都是45min, coding兩題, 最後5分鐘是給你問問題, 時間很緊所以都會滿直接給Hint, e.g. 這個用inorder應該做不出來喔! or 這題不用in-place做!
- Phone Interview - 45min, 兩題Hard (Sort, DFS)
- Coding - 45min, 1 medium(linkedlist), 1 hard(backtrack)
- Coding - 45min, 2 medium(binary tree + prefixSum)
- Coding - 45min, 1 medium(2d dp) + 1 hard(graph)
- System Design - 45 min, System Design經典題
- Behavior Interview - 45 min
- Hiring commitee - Recruiter說Got hire/strong hire on everyround, especially system design幫忙爭取E6 Offer, 但HC覺得過去經驗的Scope不夠到E6,給了E5。
- Team match
- Offer
結果:Offer Get (E5),考慮了很久最後決定Take Google Offer
Meta Production Engineer (Dublin)
當初同時也投了這個職缺,因為本身經驗都是以JS fullstack為主,Skillset滿合就想說來試試,後來才發現interview時程太滿就只準備了SWE的面試,這裡算是硬著頭皮裸考純靠過去經驗上戰場…但還是可以分享一下:
- UI Coding Interview - JS兩題工作上會遇到的問題
- Lower Level Design Interview - Nodejs底層API實作
- PE System Design - 45min, design cli tool
- Coding / System Design / Behavior - 原本還有三場但和recuiter表達SWE已經面試很多關了能不能直接參考,後來讓我直接skip了。
結果:Offer Get (E4)
Google SWE-SRE (London + Dublin)
透過朋友內推投了London / Dublin的缺,約6月初Recuriter電話聊了一下約六月底面試
- Phone Interview: 非常規算法題,實作面試官要求的功能 (medium~hard)
- Coding: 這場滿特別我沒做出最佳解,我用2D DP, 最佳解是Greedy, 我最後做完有提出很可能有Greedy解,Feedback是解題和溝通都順暢, 拿到hire
- Coding: Binary search (hard),這場很快做完提早15分鐘結束,結果只拿到Hire說解法可以再做一些優化所以沒有strong hire
- Coding: 非常規算法題,一開始難度easy, 很顯然的O(n)解, follow up難度Hard,問有沒有辦法降複雜度,面試官說這題整年沒遇過有人解出來,他給了一些提示最後我有解出來他整個很High, 我也很High
- System design: 45min, 非經典題型但算是工作上實際會遇到的新系統Design
- Googleyness: 45min
- Hiring Commitee: Skip, Recruiter電話通知所有Round都Hire,可以直接跳過HC
- Team match: 和uk, ireland的team主管聊興趣
- Offer
結果: Offer Get - Google UK L5, 最後決定去Google圓夢,當初當工程師一直覺得有一天要進去看看。
Uber Senior Web Developer (Amsterdam)
和recuiter聊天時有被問了一些簡單的Web快問快答問題,介紹了一下面試內容,大致上是說就考DSA,寄來的事前準備也是這樣寫,但…
- Coding Interview: 一進去看到一個GIF動畫就傻了幾秒,是考純前端CSS + Typescript React,考題是給一個GIF動畫,請你用Reactjs coding出一個一樣的效果,我坦白跟面試官說我以為是考算法,上次寫前端是一年前但我還是可以試試,憑著印象跟很尷尬的問面試官React hook的Syntax還是做出了和動畫一模一樣的效果,面試官表示很滿意,但討論了一下我的期待是做Fullstack而非純Frontend就沒有後續了。
Uber Senior SRE (Amsterdam)
- Coding interview: Hard * 1, 掙扎很久最後有bug沒完整做出來,特別的地方是uber面試用的平台可以run code
- Coding interview: 1題medium follow up到hard
- System design: system design經典題
- System design + past experience interview: 和主管聊過去專案,recruiter說可以做個powerpoint介紹, 面試當天Recruiter告知該team headcount被內轉佔走了,但我前面的feedback都是hire,問我還有沒有興趣和其他部門主管interview,當時因為已經確定可以拿到Meta/Google offer就婉拒了。
Microsoft (Dublin)
朋友六月內推後八月才收到面試邀請和OA,做了一下難度是兩題Medium,OA過了但已經Accept Offer因此婉拒。
心得
不論是coding interview或是system design, 用有系統的方式刷題很重要,網路上很多高手有介紹不同流派,找到一個適合自己的方法後就堅持下去,以下是一些我的感悟
演算法
- 在有限時間下,Leetcode精和多需要找到一個平衡。精:每一種題型都要做過,隔一陣子要複習,不一定要整個重寫但是要能想出對的思路。多:Leetcode每日 + weekly/biweekly contest,同時培養面對未知題型的能力。
- 平時刷題要有自言自語的習慣,假裝自己在和面試官對話,而且每一題都要逼自己想出時間複雜度,最好是先把思路/複雜度都想好了才開始實作。
- 英文是一個很大的門檻,練習時要強迫全英文自言自語
- 短時間認真刷一定會頭痛的,加油撐下去,當時我每天頭痛,很常半夜醒來發覺腦子在快速跑演算法就睡不著了。在頭痛刷題的你並不孤單
System Design
- 釐清需求才開始Design
- Back-of-the-envelope calculation要多練習
- 邊畫圖一樣也要邊自言自語,模擬和面試官講解
- 不要死背,交叉參考同一個系統網路上不同的design方式,結合自己的過去經驗畫出屬於自己的架構圖
自己的一些練習記錄