Sing's Log

Knowledge Worth Spreading


  • Career Coach

  • Portfolio

  • Search

SSH to server without password

Posted on 2021-09-15 | Edited on 2025-09-08 |

The requirement to ssh to server without password

To ssh without password, you must meet the condition:

  • Private key in client ~/.ssh/
  • Public key in server ~/.ssh/authorized_keys

Steps to setup

  1. Create ssh key pairs by ssh-keygen

    1
    2
    3
    4
    5
    6
    7
    # Generate key
    ssh-keygen

    # Check the generated key pair
    ls ~/.ssh
    -rw------- 1 sing staff 1679 Jun 8 2018 id_rsa
    -rw-r--r-- 1 sing staff 404 Jun 8 2018 id_rsa.pub
  2. Login to your server

  3. Copy the content of the publicKey (id_rsa.pub) to server’s ~/.ssh/authorized_keys

    1
    echo "${public key content}" >> ~/.ssh/authorized_keys
  4. Make sure the sshd setting /etc/ssh/sshd_config allow publickey authentication,

    1
    PubkeyAuthentication yes

    Restart by sudo systemctl restart ssh if you modify the sshd setting.

  5. Modify ssh config (~/.ssh/config) in your client to indicate which ssh key to use

    1
    2
    Host <server ip>
    IdentityFile ~/.ssh/id_rsa
  6. Verify ssh without password

    1
    ssh username@serverip
Device pixel ratio - How to select a proper size image that looks sharp and display fast on different devices

Posted on 2021-09-14 | Edited on 2025-09-08 |

What is Device Pixel Ratio?

The term device pixel ratio plays the crucial role in different languages’ styling. The definition of Device pixel ratio from MDN:

The devicePixelRatio of Window interface returns the ratio of the resolution in physical pixels to the resolution in CSS pixels for the current display device.

My translation:

1
Device pixel ratio = (Device physical pixel width) / (Width of a device in a program)

For instance an iPhone12:

  • Physical Width: 1170px
  • CSS width: 390px
  • Device Ratio Pixel: 1170px / 390px = 3

How to select a proper width image

1
Proper image size = devicePixelRatio * width

If you setup a image with style width:150px, the phone will use 150 * 3 = 450 physical pixel to render, so the proper width of the image should be 450

Common Device Pixel Ratio

Reference

  • https://www.mydevice.io/
  • https://developer.mozilla.org/en-US/docs/Web/API/Window/devicePixelRatio

Display iphone/android screen on Mac

Posted on 2020-11-16 | Edited on 2025-09-08 |

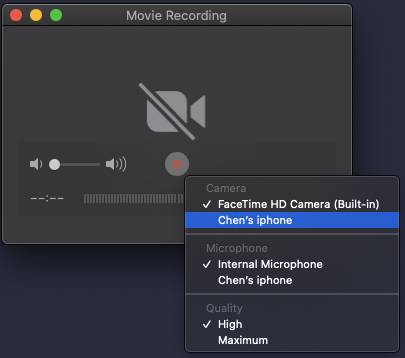
Display iphone screen on Mac

  1. Connect your iphone through wire.
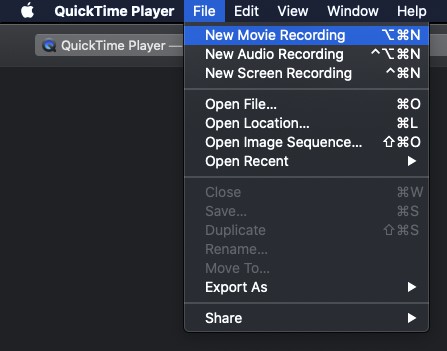
  2. Open QuickTime Player
  3. File > New Movie Recording
  4. In the recording screen, select the dropdown > camera > your iphone name

Display Android Device on Mac

  1. Install scrcpy by brew install scrcpy
  2. If you don’t have adb, run brew cask install android-platform-tools
  3. Connect your Android phone through wire
  4. excute scrcpy

Schedule backup Mongodb to AWS S3 with DroneCI cronjob

Posted on 2019-10-18 | Edited on 2025-09-08 |

To schedule backup mongodb to AWS S3 could be done extremely easy in any docker pipeline, here is an example using DroneCI docker pipeline and cronjob feature. The complete code example could be found here: https://github.com/Asing1001/mongodb-s3-backup.

  1. Create .drone.jsonnet file using docker pipeline
  2. Use mongodump in step1 to create archive
  3. Upload the archive by s3 plugin in step2

    1
    2
    3
    4
    5
    6
    7
    8
    9
    10
    11
    12
    13
    14
    15
    16
    17
    18
    19
    20
    21
    22
    23
    24
    25
    26
    27
    28
    29
    30
    31
    32
    33
    34
    35
    36
    37
    38
    39
    local backupLocation = 'mongo-archive.gz';

    [{
    kind: 'pipeline',
    name: 'default',
    steps: [
    {
    name: 'mongodump',
    image: 'mongo:3.6.5',
    environment: {
    DB_URI: {
    from_secret: 'db_uri'
    },
    },
    commands: [
    'mongodump --gzip --uri="$DB_URI" --archive=' + backupLocation,
    ],
    },
    {
    name: 'upload',
    image: 'plugins/s3',
    settings: {
    bucket: 'mongo-backup',
    access_key: {
    from_secret: 'aws_access_key_id',
    },
    secret_key: {
    from_secret: 'aws_secret_access_key',
    },
    source: backupLocation,
    target: '/',
    },
    },
    ],
    trigger: {
    event: ['cron', 'push'],
    branch: 'master'
    },
    }]
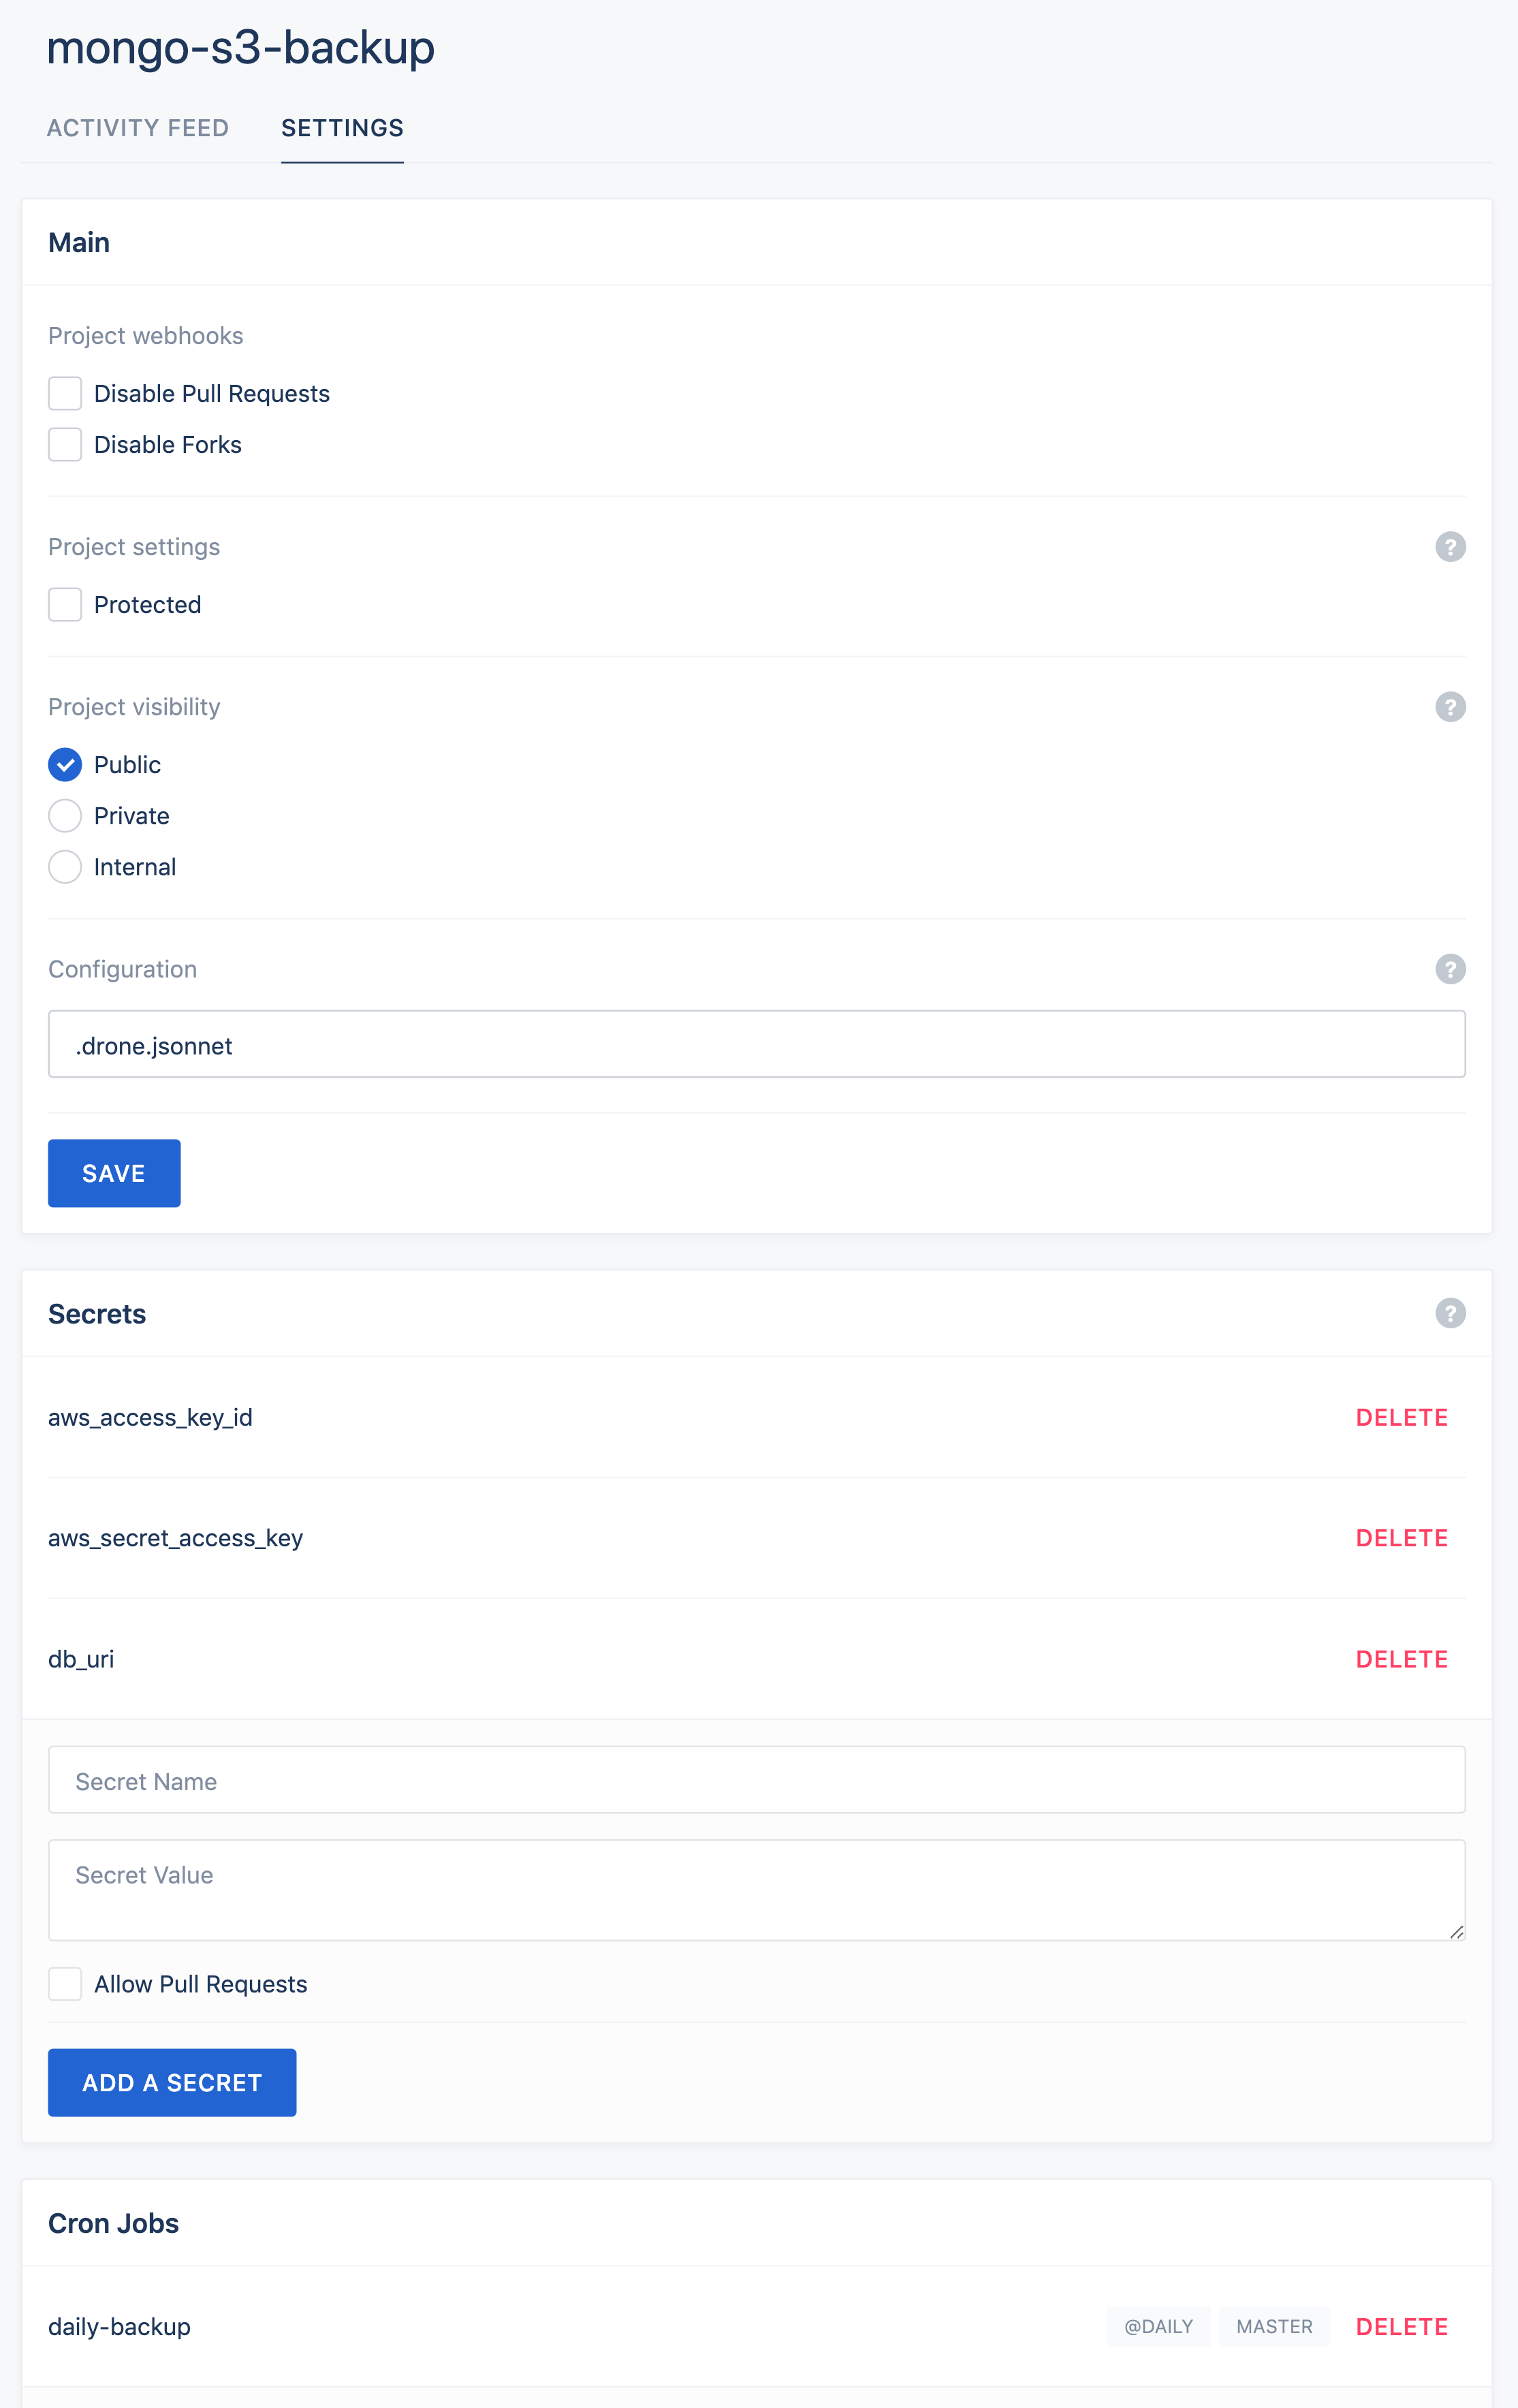
  4. Activate the project in DroneCI and fill up variables aws_access_key_id, aws_secret_access_key, db_uri

  5. Setup Cron jobs in Drone project’s settings
    drone-mongo

  6. Push the repository and verify the job :)

Reference

  • Drone
  • mongodump
  • drone S3 plugin

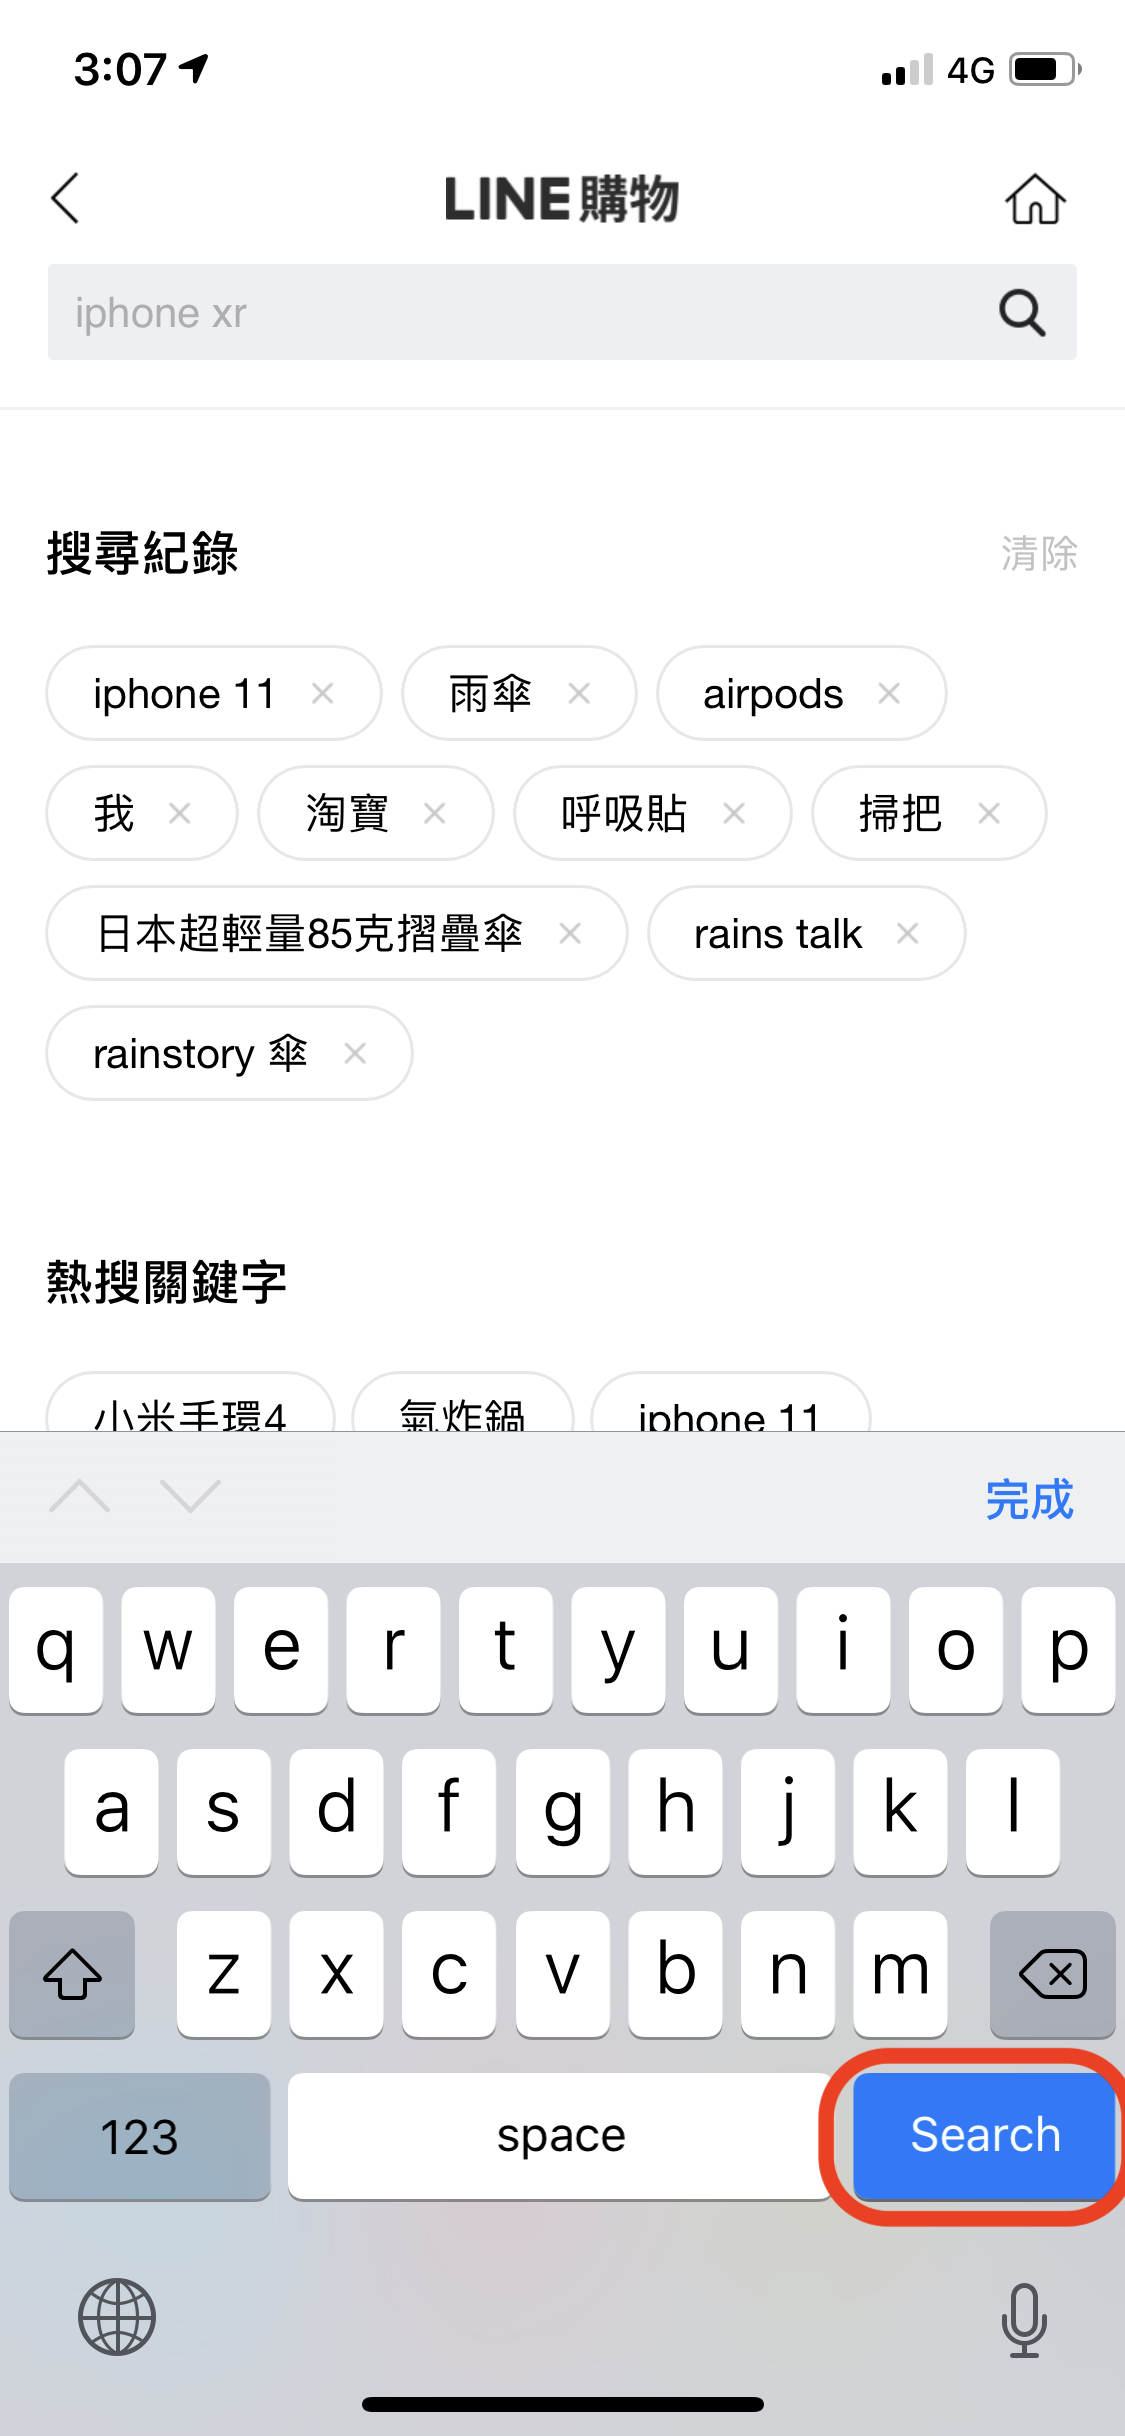
Show "Search" button on mobile keyboard

Posted on 2019-09-18 | Edited on 2025-09-08 |

For Android

Only type="search" is required on <input>

For IOS

It is required to wrap <input type="search"> inside a <form action>, note that the attribute action is must-have.

For all mobile devices

To sum up, the minimum requirement on mobile is:

1
2
3
4
5
<form action>
<input
type="search"
>
</form>

To try on mobile device, here is a live example on JSFiddle :

[Drone CI] migrate pipeline config from 0.x to 1.x

Posted on 2019-09-11 | Edited on 2025-09-08 |

New syntax for pipeline and step

1
2
3
4
5
6
7
- pipeline:
- custom-step:
- image: some-image
+ kind: pipeline
+ steps:
+ name: custom-step
+ image: some-image

Custom plugin variables should be placed under settings

1
2
3
4
5
6
7
8
9
10
kind: pipeline
name: default
steps:
name: custom-plugin
image: some-image
- foo:
- bar: baz
+ settings:
+ foo:
+ bar: baz

GIT submodule note

Posted on 2019-08-20 | Edited on 2025-09-08 |

Clone repository with submodule

1
git clone --recursive <repo_url>

Clone submodules after repository cloned

1
2
git submodule init
git submodule update --recursive

Add submodule

1
git submodule add <submodule_clone_url> <submodule_folder>

Remove submodule

Step1 - Remove submodule folder

1
2
git rm --cached /path/to/submodule
rm -rf /path/to/submodule

Step2 - Remove submodule config in .gitmodules

1
2
3
4
5
6
-[submodule "themes/next"]
- path = themes/next
- url = https://github.com/Asing1001/hexo-theme-next.git
[submodule "themes/next-reloaded"]
path = themes/next-reloaded
url = https://github.com/Asing1001/hexo-next.git

Update submodule to latest commit

Step1 - Checkout the target version of the submodule

1
2
3
4
# Go to the submodule folder
cd projB/projA
# Checkout the target commit
git pull origin master

Step2 - Commit the update

1
2
3
4
# Back to the parent folder
cd ..
git add projB/projA
git commit -m "submodule projA updated"

Reference

  • https://stackoverflow.com/questions/8191299/update-a-submodule-to-the-latest-commit

[VSCode] settings and shortcuts

Posted on 2019-06-18 | Edited on 2025-09-08 |
  • command 0 - Focus on sidebar
  • cmd+d - For don’t save
  • gb - For multi cursor in vim mode
  • cmd+shift+. - show breadcumb

Settings.json

1
2
3
4
{
"editor.autoIndent": true,
"editor.snippetSuggestions": "top",
}

References

  • http://vimdoc.sourceforge.net/htmldoc/motion.html

[GTM] Get the item order in a list

Posted on 2019-02-21 | Edited on 2025-09-08 |

Google Tag Manager(GTM) is a back office for quickly managing HTML on webpages, basically, it enables the maintainer to do Everything on their website without changing the code base. There are three major elements in GTM which are Tag, Variable, and Trigger.

Tag

A Tag will be triggered by the Trigger you set and passing both the system defined variables and the user-defined variables to your Tag, then you could take the action such as sending it to GA or manipulate DOM on your pages.

Variable

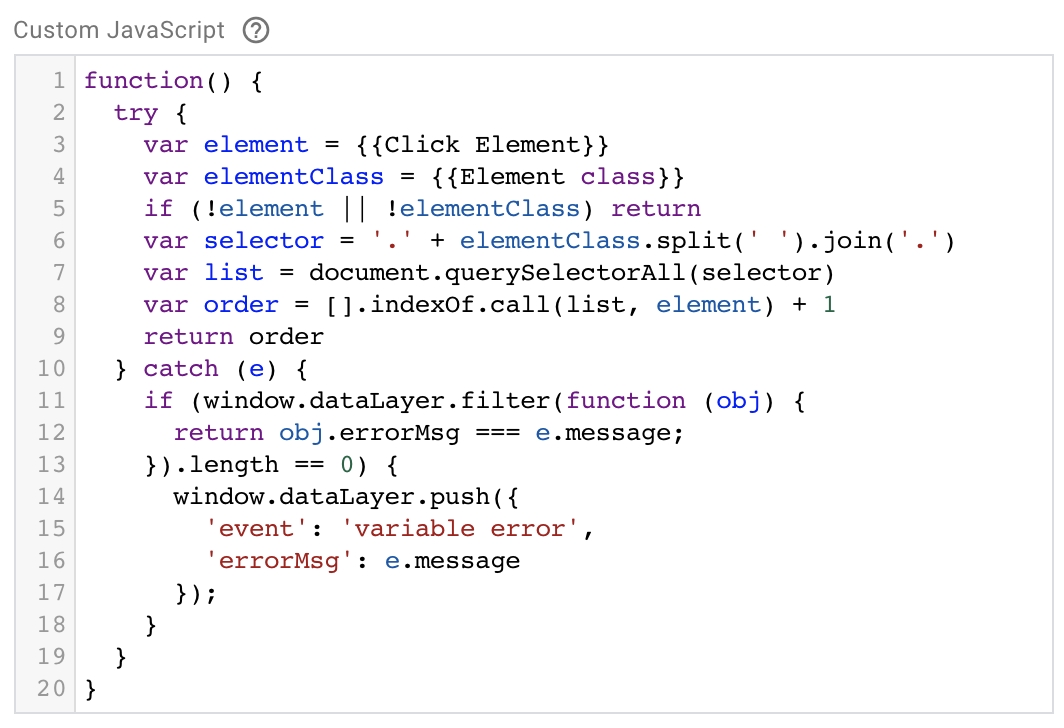
Other than System defined variables, you could create your own by Javascript:
Select User-Defined Variables, then select the type Custom Javascript

1
2
3
4
5
6
7
8
9
10
11
12
13
14
15
16
17
18
19
20
function() {
try {
var element = {{Click Element}}
var elementClass = {{Element class}}
if (!element || !elementClass) return
var selector = '.' + elementClass.split(' ').join('.')
var list = document.querySelectorAll(selector)
var order = [].indexOf.call(list, element) + 1
return order
} catch (e) {
if (window.dataLayer.filter(function (obj) {
return obj.errorMsg === e.message;
}).length == 0) {
window.dataLayer.push({
'event': 'variable error',
'errorMsg': e.message
});
}
}
}

Trigger

Connect to GCP MySQL through XAMPP

Posted on 2018-11-18 | Edited on 2025-09-08 |

Background

XAMPP is the most popular PHP development environment including a great GUI - phpMyAdmin, I would like to connect it to a cloud MySQL DB - Google Cloud Platform MySQL.

Requirement

  1. XAMPP installed
  2. Create a Google Cloud Platform (GCP) account
Read more »
1234…10
Sing Ming Chen

Sing Ming Chen

Sing's log, a developer's blog

91 posts
260 tags
GitHub E-Mail Linkedin
© 2025 Sing Ming Chen
Powered by Hexo v3.9.0
|
Theme — NexT.Gemini v6.3.0